Pages

Showing posts with label Store Cupboard Chic. Show all posts

Thursday, 12 July 2012

Chocolate covered coconut macaroons


The world is going mad for macarons, the multi-coloured garish almond based meringue confections popular for afternoon tea around the world. Since I started working in London, I've seen swathes of tourists clutching pastel paper bags from the likes of Laduree. They're not the kind of thing that you find in Somerset! 


I'm partial to the odd macaron; they're cute, (dare I say) girlie and wonderfully bite-sized. However, they are a bit of a pig to bake. Achieving that light and fluffy texture is rather unpredictable, much like the somewhat troublesome meringue. If you're in need of a tasty sweet snack, maybe it would be better to by-pass the chichi and look a little closer to home. 


Macaroons (note the double 'o') are easy to throw together and provide the same deliciously sweet hit without the kitchen faff. According to the wonder that is Wikipedia, English macaroons and French macarons share the same Italian word maccarone or maccherone which derives from ammaccare meaning to crush or beat. Don't run away in horror; this refers to the crushed nuts that are the main ingredient of both recipes. Both are cousins of amaretti, the crunchy Italian almond biscuit. It's a very European affair.


I adore this recipe because it really is so simple. Bung the ingredients together, shape and pop in the oven. Decoration is optional but I like any excuse to mess around with chocolate. I've made these several times and they're an ideal mid-week bake because they're quick and easy to make out of ingredients that tend to lurk in the back of the larder. Oh and they're naturally gluten free too! 

Coconut macaroons
Makes 16 – 20

2 egg whites
300g unsweetened grated coconut (or the same of desiccated coconut)
3 tbsp runny honey (omit if using desiccated coconut)

To decorate
150g dark chocolate
10 glacé cherries (optional)

 - Preheat oven to 180C and line a baking tray with a silicon or greaseproof paper.
 - Whisk together the egg whites and honey (if using).
 - Add the coconut and stir until coated.
 - Scoop out tablespoon dollops of mixture, compact slightly and evenly space on baking tray.
 - Bake for 10 – 12 minutes or until golden brown.
 - Remove to a wire rack and allow to cool.
 - Melt the chocolate in a heatproof bowl over a pan of boiling water.
 - Meanwhile, halve the cherries so that they’re ready to garnish.
 - Dip the flat base of each macaroon into the chocolate and place on a tray covered in silicon or greaseproof paper. If you want a particularly luxurious macaroon, allow these to cool and dip again.
 - Drizzle the top of the macaroons with melted chocolate and garnish with a half cherry, dipped in a little chocolate to act as glue.

Saturday, 5 May 2012

Sticky Toffee Bread and Butter Pudding


Sometimes the simplest combinations are the best. Salty Cheddar cheese paired with sweet and sour Branston pickle, for example, or sweet ripe tomatoes combined with aromatic basil leaves. Both examples are far more than the sum of their parts. Bread and butter is another classic duo which are endlessly versatile; they work as an accompaniment with all sorts from scampi to jam.

I must admit that I was never drawn to the British classic, bread and butter pudding, when I was young. I always associated bread with savoury flavours and so, the idea of adding it to a sweet dish didn't compute. How wrong I was! It's such an easy dessert to make and is very forgiving if you feel the need to bend the recipe to your culinary whims. For my recent al-fresco-feeding-of-the-many-people moment at Cronkshaw Fold Farm, I added a luxurious sticky toffee element - as a nod to another British classic - but you could omit the deliciously sticky dates and caramel sauce for dried cranberries and white chocolate instead. Raisins and nuts would work well too. Or you could go for a virgin version and revel in simple stodgy comfort food. Either way, hot or cold, this ones a winner.

One of my lovely friends (I only have lovely friends, you understand) is gluten intolerant, just like my dear Mum, so my version was made - very successfully, I might add - with gluten-free bread. The custard binds everything together so that the bread, which without gluten is usually very dry and crumbly, was soft and moreish.

Sticky Toffee Bread and Butter Pudding
Serves four (multiply at will)

For the pudding
150g pitted dates
½ tsp bicarbonate of soda
50g butter
10 slices of bread (brown, white, granary – the choice is yours)
400ml milk
2 eggs
25g sugar (plus 1 tbsp to top the pudding)
1 tsp vanilla extract

For the sauce
100g sugar
100g butter
100ml cream

- Preheat the oven to 180C.
- Put the dates and bicarbonate of soda in a small saucepan and top up with water until just covered. Place over a low heat and simmer until the dates have broken down, stirring occasionally. Once the process is complete, they will look alarmingly like tar but fear not, as they taste amazing. Remove from the pan and set aside.
- Meanwhile, whisk the eggs and sugar together until creamy. Set aside.
- Once the dates have completely collapsed and you've emptied the pan, pour the milk into the saucepan and place over a low heat to warm through. This has the double benefit of infusing the milk with the toffee notes of the dates while making the pan easier to clean (as well as reducing washing up!).
- While the milk is warming, butter the bread then smear with a little date mixture and cut diagonally into triangles.
- When the milk has come to temperature, whisk slowly into the eggs and sugar.
- Place a few slices of the buttered bread into a baking tin, slightly overlapping them as you go. If you have any of the date mixture leftover, add a smear or two of that. Repeat the layers until you've used up all of the bread.
- Slowly pour the egg mixture over the bread and leave it to soak for 30 minutes or so. You might want to press the bread down into the mixture so that it soaks up all of the custard-y goodness.
- Scatter with the reserved sugar and bake for 40 - 45 minutes until golden brown and crisp on top.
- While the pudding is in the oven, melt the sugar in a saucepan over a low heat. Stay on the ball here or you’ll end up with a burnt mess. The edges will start to melt first – as soon as the first centimetre or so starts to turn golden brown remove from the heat and whisk the butter into the mixture.
- Next pour in the cream and return to a low heat, whisking constantly to remove any lumps. Add a pinch of fleur de sel or sea salt if you’re feeling fancy and want to go for a de rigueur salted caramel sauce.

Tuesday, 24 January 2012

Caramelised balsamic onions


I don’t know about you but I love a versatile ingredient; an item that can spark (at least) a dozen recipe or meal ideas and a flush of food-related excitement. There are many, many things that have that effect on me but there’s one in particular that I would like to share with you today.

Caramelised onions.

Those two words set off a firework of cooking concepts in my mind; recipes sizzle in my sub-conscious while images flicker in front of my eyes. Caramelised white onions in bolognaise sauce, sweet fried onions piled onto cheese atop a crisp cracker, crumbly goats cheese tart mingled with caramelised red onions, a rich onion-y hit in soups and stews… the list goes on and on. My mouth is watering while I type!

You can buy jars of onions chutney in the supermarkets which is all well and good but you can easily make your own easily and cheaply at home. Onions are a staple which I always have in my store cupboard because they are the foundation of many (most!) of my savoury dishes. Caramelising simply involves cooking them over a low heat for an extended period of time to bring out their natural sweetness. Once cooked, they can be kept for up to a week in the fridge but I doubt very much that they will last that long! If you have enough self-control, a jar of deliciously soft and sweet onions can make a fantastic gift idea for foodies.So if you’ve ever wondered how to make caramelised onions, read on.

I’d love to spend tons of time slaving over the stove but I genuinely don’t have the time. My recipe below gives you a cheat’s option which side steps the traditional yet time-consuming caramelising process. Of course, if you have the time to spare, by all means sweat them down over an hour or so to get the most out of them. If, like me, you’re short on time but need your onion fix, give this easy healthy recipe a go!


Balsamic caramelised onions
Makes 1 jar

Ingredients:
2 onions (red or white)
1 tsp sunflower oil or butter
½ tsp sugar or honey
1 tsp salt
3 tbsp balsamic vinegar

- Halve the onions, peel and slice. Sniffle.
- Pour in the oil (or butter, allowing it to melt if using) to a heavy based frying pan over a medium heat.
- Add the onions and sweat (covering with a lid) for five minutes or until softened.
- Remove the lid and reduce the heat. Cook for a further 10 to 20 minutes, stirring occasionally, until golden brown. The onions may catch on the bottom of the pan which is okay but don’t let them burn. If the mixture starts to look too dry, add a little water.*
- Add the sugar/honey and salt and stir well.
- Drizzle the onions with balsamic vinegar and use a metal or wooden spatula to scrape any browned bits from the bottom of the pan. Simmer until the balsamic has evaporated.
- Store in a jar in the fridge for up to a week. Smother on crackers, add to cheese toasties... the possibilities are endless!

*At this point, you could cook for up to an hour if you have time for a more traditional caramelised flavour.

Wednesday, 14 September 2011

Healthy Sin-Free Fruit Flapjacks


Looking for a way to use up your egg whites after making mayonnaise or custard? You could make meringues but for a sturdier snack, try these delicious flapjacks. The great news is that these can be whipped up using store cupboard ingredients combined with glorious in-season apples. The combination of egg whites and apple purée aren't detectable in the finished flapjacks but do away with the need for butter and oil like your usual recipes resulting in a guilt-free snack.

We have tons of apples at this time of year, for which we're indebted to to our generous families and neighbours, but I do know that Sainsburys are currently selling big bags of British Bramley apples for a mere £1. One bag will do you well for this recipe as well as crumbles and cakes galore. I've taken to stewing batches in the microwave for a few minutes and then freezing batches ready for later in the year when we're craving hot apple pies when the tree branches are bare. Throw in a few hedgerow blackberries too!

Another idea for freezing or using your gluts is apple sauce or purée. Peel, core and chop your apples, stew for a few minutes until softened and either keep chunky or mash/blitz in a food processor. Add sugar and/or salt to taste and serve with roasted pork or cold cuts. This freezes really well so that you can have a tasty, healthy condiment all year round. Alternatively, make a large batch, freeze half of it and use the rest in this tasty recipe! I tend to leave out the sugar when I'm using it for baking but it depends how much of a sweet tooth you have. They're pretty sturdy bars so they're ideal for throwing into school lunch boxes and into your rucksac for a mid-ride/walk energy boost.


Healthy Sin-Free Fruit Flapjacks
Makes 16 flapjacks

175g rolled oats
85g muesli
100g dried fruit (I used apricots and raisins)
50g mixed seeds or nuts (I used pumpkin, sesame and sunflower)
5 tbsp honey
2 egg whites
175g apple purée or sauce

- Preheat the oven to 180C and line a 20cm x 20cm baking tin with greaseproof paper.
- Gently warm the honey in a saucepan or in the microwave until runny.
- Combine the oats, muesli, dried fruit and seeds in a bowl and pour in honey, egg whites and apple purée. Stir until completely combined.
- Press the mixture into the tin and bake for 20 minutes or until firm.
- Leave to cool and slice into squares.

Fancy flapjacks in with your cuppa but don't fancy these ones? Keep it fruity with Apple & Blackcurrant Crumble Flapjacks but substitute with any seasonal fresh berries that you have such as blackberries. Or maybe you'd prefer sublimely soft Banana Flapjacks which you could top with melted chocolate if you're freely really sinful!

Friday, 22 July 2011

Emergency Mushroom Pasta


Everything is relative. When I first started cycling to work about a year ago, I thought that sixteen miles was a long way to cycle. Now, it feels reasonable. A little wimp-ish even. It might be something to do with having friends who are seasoned road cyclists and will do a hundred miles in a weekend without batting an eyelid. I now cycle between 30 and 50 miles a week and am hoping to up it as the weather improves (it’s going improve, right? Right??). Anyway, on a similar vein, time is also relative. Half an hour might not be very long to wait for a meal in the grand scheme of things but when you’ve just finished a sixteen mile ride in the rain, it seems like an eternity. My tummy isn’t very big either but it can feel like an echo-y cavern when it’s not been filled with tasty things.

This particular trick of time and space was my quandry just the other day. And once again the cupboard was bare. Our fridge sported a pack of mushrooms, a little butter, some milk and a wizened nugget of parmesan. Oh great. My hunger was starting to peak after my ride and my stomach was making it clear that it was very unhappy indeed. Thankfully, my windowsill herbs have been flourishing so I had fresh parsley and basil at my disposal.

Cue, the crisis food. This dish would probably be lovely with cream cheese, crème fraiche or even cream if you have it knocking around but we didn’t. A roux (butter and flour) thickens the milky mushroom-y mixture so that’s its deliciously warm and satisfying. Just what I needed.


Emergency Mushroom Pasta
Feeds two hungry people

1 onion, sliced
150g mushrooms, sliced
1 clove of garlic, minced
150g pasta or spaghetti
100ml semi-skimmed milk (or whatever you have)
2 tbsp butter
2 tbsp flour
50g parmesan cheese, finely grated
Small handful of parsley or basil, chopped
Sunflower or Olive oil

- Sweat the onions and garlic in a large saucepan over a low heat in a little oil for around five minutes or until they are completely softened and sweet.
- Add the mushrooms and cook for a few minutes until tender.
- Put your pasta on to boil.
- Pour in the milk and stir until it is just off simmering.
- In a bowl, cream the butter and flour together into a paste.
- Take a ladle or two of milk from the mushrooms and whisk into the flour/butter paste until smooth. Add this into the saucepan and gently heat through, stirring as you do so, until the sauce starts to thicken.
- Add the grated parmesan and continue to stir until its mostly dissolved
- Once your pasta is cooked to your liking, drain it, reserving the cooking water, and add to the saucepan of sauce.
- Loosen the mixture with a little cooking water until it’s to your preferred consistency – I was in the mood for a light sauce so I made it relatively thin.
- Throw in the herbs, stir through and serve immediately with extra parmesan shavings and a whole lot of gratitude.

Thursday, 7 July 2011

Marmalade Cake


I made marmalade for the first time this year. It was a mixed bag of citrusy success but it did get me into the preserving mindset. It's surprisingly addictive! Consequently, we had several jars of my own grapefruit brew and some lemon too (to please The Boy who thinks that grapefruits are a favourite of the devil). Our jar tower was added to considerably by my Mother in Love who gifted us with jars of deliciously dark seville orange marmalade and a fabulous friend who gave us a sample of her first batch of orange marmalade.

With a self-catering weekend away approaching, I wanted to make some cake for those lazy afternoon tea moments where you're in need of something to tide you over until dinner and a biscuit just won't do. Usually, I'd make lemon drizzle cake as it's something that The Boy adores but my marmalade mountain was staring me down as I reached for my recipe book.

I must admit that marmalade cake isn't something that I'd normally go for. I'm a recent marmalade convert so I suppose I assumed that a cake flavoured with it would be a little full on. This recipe, however, is basically just a great tea cake with a hint of citrus tang. It's a great way to use up marmalade that hasn't set as well as you'd hoped; my grapefruit and lemon concoction is quite a soft set so it's ideal for this.The mixed nuts really make a difference and I was toying with the idea of adding soaked sultanas too but decided against it for my most recent batch. If they take your fancy, soak them for as long as you can (ideally overnight) in orange juice, cold tea or water (depending on your tastes) and fold them before you pop them in the loaf tin.

Take a thick slice into the sunshine and enjoy with a cup of tea!


Marmalade Cake
Makes 12 - 14 slices

175g butter, softened
225g self raising flour
175g light brown muscovado sugar
3 eggs, beaten
1 tsp baking powder
100g mixed nuts, roughly chopped
2 tsp cinnamon
½ tsp nutmeg
140g (homemade) marmalade

 - Preheat your oven to 180c. Line a loaf tin with greaseproof paper and set aside.
 - Sift the flour, baking powder, cinnamon and nutmeg together into a large mixing bowl.
 - Stir in the sugar then add the butter and eggs into the bowl with all but 2 tbsp of the marmalade.
 - Beat the mixture until it is pretty much smooth. If you can, do this with an electric mixer. I didn't have one which made it a bit of a time consuming process.
 - Fold in the nuts and spread the mixture evenly into your prepared loaf tin.
 - Bake for 1 hour or until a skewer comes out without any batter sticking to it. Cover the cake with foil after 30 minutes (or when the top is golden brown) so that it doesn't burn.
 - Put the cake to one side to cool slightly while you prepare the marmalade glaze. Mix the marmalade with a tablespoon or so of boiling water - you want it to be the consistency of runny honey.
 - Prick the cake with a skewer or fork and pour the glaze over the top, spreading out with the back of a spoon to ensure that it is coated.

Friday, 1 July 2011

Bacon and Broad Bean Hash


Having had yet another Mother Hubbard moment, I concocted this dish from the odds and ends that had been frequenting our fridge. One sad and solitary potato, the heart of a sweet heart cabbage and some bits of bacon that were left over from a pasta dish. I quite like the challenge of a near-empty fridge - sometimes too much choice can be a bad thing and an excuse for dithering.

With broad beans coming into season, this is a great way to use these deliciously savoury legumes. Ideally, they'd be fresh from the pod and into the pan but if yours aren't quite ready to eat or if, like me, you don't have a vegetable patch at your disposal then the frozen ones are great. If you're not a fan, substitute with peas though I'd probably go for finely chopped mint instead of parsley.

Super-simple flavours. Incredibly easy cookery! Great for summer - chuck everything in a pan to flash it with a little heat and then enjoy outside on your patio chairs. In our case, we'd be huddled on the back step. We just ate at the dining table but the sun was streaming through the window.


Bacon and Broadbean Hash
Serves 2

1 large potato, cubed
125g (smoked) bacon, sliced
½ onion, sliced
¼ sweet heart cabbage, chopped
100g broad beans
Handful of flat leaf parsley, finely chopped - with a few whole sprigs reserved to garnish (if you're feeling fancy)
 
 - Par boil the potatoes for three minutes. I like to do this in the microwave because it seems more efficient.
 - Meanwhile, dry fry the bacon in a non-stick frying pan over a medium heat. The bacon should colour up and expell any fat into the pan.
 - Mop up some of the fat from the pan with kitchen towel, leaving about a tablespoon remaining. Drain the potatoes (reserving the liquid) and add along with the onion and cabbage.
 - Keep everything moving around the pan so that it doesn't stick or burn. Fry for about four minutes or until the potato starts to colour.
 - Add the broad beans and a splash of the cooking liquid. Keep stirring and cook for a minute or two until they're cooked to your liking. If you're using frozen broad beans, cook for four minutes or until piping hot all the way through.
 - Just before serving, stir in the chopped parsley then pile onto your plates.

Friday, 10 June 2011

Spicy Roasted Chickpeas - A delicious and healthy snack!


My current office is a snack paradise. There are biscuits and sweeties galore, which is dangerous if you don’t have much will power (ie. me). I’ve realised, since I’ve worked here, that hunger can be psychological. I’m not necessarily hungry until I see the biscuit tin or until I hear one of my colleagues crunching through some crisps. Of course, writing about food regularly adds to my appetite too.

I’ve developed an arsenal of healthy snacks to keep me on the straight and narrow. Rice cakes are on hand for their satisfying crunch rather than flavour (as they don’t really have any of the latter but tons of the former). Rye crisp breads with dried fruit come in handy when I have a biscuit craving and I always have fresh seasonal fruit too. Sometimes I have a clamouring for something savory to pick at and my normal (thoroughly addictive) go to is cashew nuts but though they are choc ful of great things like protein, they are relatively high in fat. So when I saw healthy snack chat on BBC Good Food's facebook page, I had to see what everyone was nibbling on. Karolina from lovely Senses in the Kitchen blog put forward an amazing recipe for roasted chickpeas, which I just had to try out.

Chickpeas are a great source of protein without the fat that's associated with nuts. They also have iron, folic acid and fibre tucked away under their skins. I think this would work with any fresh or dried herbs and spices that you might have. I used chilli and paprika as the main flavours but you could use harissa for a Morrocan vibe or go sweet with cinnamon, nutmeg and a little honey. Change it up with different oils as a base - I used olive oil but sunflower, rapeseed or walnut would also work well. Chickpeas are a fantasticly versatile base for flavour plus they're part of a deal at Sainsburys at the moment where you can get 3 cans for £1 - a saving of 80p (more than a whole can free!). Everyone might be talking about kale crisps but we know where the real flavour is at...


Spicy Roasted Chickpeas

1 can (410g) ready to eat cooked chickpeas

1 tbsp olive oil
1 tsp hot chilli powder
1 tsp smoked paprika
1 tsp garlic salt
1 tsp ground coriander
½ tsp ground cumin
Pinch of ground mace
Ground black pepper to taste

- Preheat the oven to 180C.
- Drain the chickpeas and rinse well in a colander, picking out any skins or green/grey chickpeas.
- Put into a large bowl and add the oil and spices.
- Stir thoroughly so that each pea is coated in oil and spices.
- Taste and adjust the seasoning depending on your preferences.
- Spread the chickpeas on a baking tray. Gently shake the tray from side to side so that the chickpeas lie in one layer.
- Roast for 30 – 40 minutes until the peas are slightly crunchy.

Sunday, 10 April 2011

Herbacious Healing

Click the image for a full-size, readable-with-out-a-magnifying-glass version


Did you know that the lovely little jars of herbs and spices could do much more than just flavour and fragrance your meals? As a doctor's daughter, I'm naturally cynical of anything that claims a certain food or drink can work miracles or, equally, lead to a painful death. This is mainly because we get so much conflicting information on the subject of health and because our overly keen media likes to jump on any study that might scare people and drag it kicking and screaming into our consciousness.

Anyway, I found this article interesting (even if it is cods wallop*).

*Not that I'm saying that it definitely is, of course...

Sunday, 28 February 2010

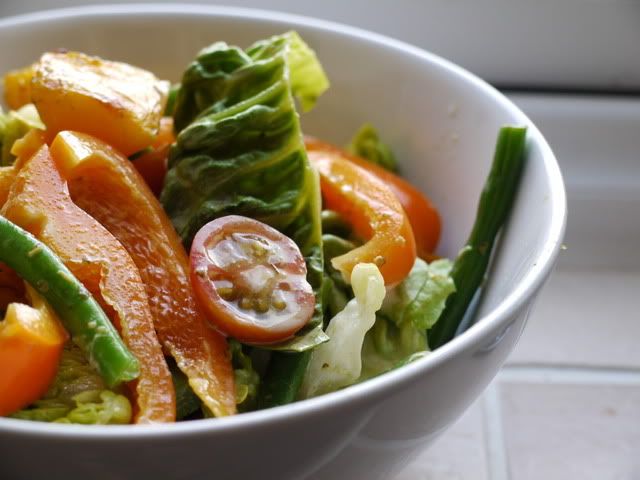
Spring Salad

The Boy is back from a scholarly week oop North and had been virtuously toiling for a great deal more of the morning than is natural for the weekend. A quick, fresh and speedy lunch was required so I threw together some ingredients we had lying around in the fridge and in the larder.

Squash and French Bean salad

You will need: (to feed one famished scholar and a lounging cook)

¼ butternut squash
One baby gem lettuce
½ orange pepper
Fistful of French beans
A few cherry tomatoes
A sprinkle of finely grated parmesan
A touch of nutmeg
Vegetable or olive oil
Salt & pepper

For the dressing:
1 tsp mayonnaise
1 tsp pesto
1 tsp olive oil
2 tsp cider vinegar

-
Preheat oven to 190C.
- Peel and cut your butternut squash into cubes around 1.5cm.
- Tip into a bowl and add a generous tablespoon of oil, a sprinkle of parmesan and a pinch of nutmeg.
- Get your hands in! Give the squash an even coating and turn out onto a baking tray.
- Season and pop into the oven for fifteen minutes or until starting to crisp.
- Meanwhile, blanch your beans for a few minutes in boiling water.
- Slice the pepper into strips and half the tomatoes and lettuce leaves.
- Remove your beans from the heat when they start to soften, drain and immerse in cold water (this will stop them cooking, keep them nice and green and prevent them from wilting your lettuce).
- Take the squash from the oven and set aside to cool.
- Mix all of the dressing ingredients together and combine with all of the veggies.

Thursday, 5 November 2009

Macaroni Cheese!

Another tiring day of work over and I head home to cook dinner. The dilemma hits me that I the cupboard is relatively bare... what to do? Well, here we go!


Macaroni Cheese with Bacon and Mushrooms


Makes: a quick and easy supper

Ingredients: (enough for two people)
1 tbsp butter
1 tbsp plain flour
1 cup milk
50g grated cheddar cheese, plus more to top
150g macaroni, dried
50g smoked bacon, trimmed and sliced
50g mushrooms, sliced


Method:
- Preheat oven to 190c.
- Boil macaroni for 10 minutes until just tender.
- Meanwhile, fry bacon and mushrooms over a medium heat in a saucepan until bacon is browned and mushrooms soften.
- Remove from pan and set aside.
- In the same pan, melt butter over a low heat then add flour.
- Stir vigourously until combined into a smooth paste.
- Add milk little by little and up the heat to medium low, still stiring.
- Keep adding milk gradually until all is added and the sauce begins to thicken.
- Add grated cheese, bacon and mushrooms and stir until combined.
- Mix macaroni and sauce together and put into an oven proof dish.
- Top with grated cheese and bake for 10 - 15 minutes until golden brown
- Serve with a fresh mixed salad


Variations:
Instead of bacon and mushrooms, use leftover roasted vegetables stirred into sauce. A little pesto in the sauce and a topping of Parmesan is nice with this option.

Saturday, 11 April 2009

Chewy Flapjacks

I like flapjacks - they feel all wholesome and good for you. Which I guess they are, if you ignore the copious amounts of butter that go into making them. Not a biscuit, not a cake; they fall into that undefinable weird snack group. My grandmother makes lovely crunchy flapjacks which is what first inspired me to look into a recipe but I must admit that I'm more of a soft and chewy person myself. Hence, when I tried some of a friend's yummy batch, I was quick to nick the recipe and modify it to make my perfect flapjack experience. Just so you know, porridge oats are really cheap - you can buy 1kg of Tesco Value Oats for a mere 58p which will make four batches of flaps.

Soft & Moreish, Ultra Tasty Flapjacks
(with thanks to Dan for the initial inspiration!)

Makes:

Soft and chewy flapjacks with a sweet and buttery taste. A great way to use up over ripe bananas.


Ingredients:

80g demarera sugar
110g (unsalted) butter
250g oats
1 banana (ideally really ripe)
2 tbsp golden syrup or runny honey


Method:

- Preheat oven to 220c
- Melt butter on a low heat
- Remove from heat and stir in sugar and syrup/honey for a few minutes (it won't all combine into a smooth mixture so don't worry too much!)
- Add oats to wet mixture and mix well until all the oats have a thin coating of buttery sugar-ness
- Mash up the banana with a fork until it's smooth and gooey
- Fold banana into oats
- Spread evenly into a non-stick tray so that it's about 2.5cm thick
- Bake for 15 - 20 minutes until golden brown on top
- Leave to cool for 5 minutes and then score into pieces with a knife

Variations:

Add dried banana chips, chocolate chunks or soaked raisins to the mixture before you bake for more flavour.

Friday, 27 March 2009

Foccacia

(not as rude as it sounds!)

I have the task of creating some appealing party nibbles for a friends cocktail party and being on a budget, I didn't want to buy a ton of pre-packed gumph. I already had flour, yeast and oil in the cupboad and a ready supply of water from the tap so I thought I'd give homemade bread a go. It's really easy so don't be daunted! Here's my take on the Italian classic...

Focaccia

Ingredients:
250g strong white flour
tsp salt
7g (sachet) yeast
Olive oil

- Combine flour, salt, yeast and a tbsp of olive oil in a bowl
- Add about 150ml of tepid water, mixing as you go. This can be very messy! Different flour will absorb varying amounts of water so add a little at a time and be prepared to use a little more or less each time. If the mixture is too dry, add a little more water. If it's still very sticky, add more flour. You're looking for a solid consistency that isn't sticky and doesn't coat your fingers as you agitate it.
- Spend about ten minutes kneading the dough on a floured surface; stretch it, then work it back over itself. You can really pound it! Work out some of your aggression until its smooth. Add drizzles of oil as you go a long to add to the elasticity.
- Prepare a baking tray with parchment and a little olive oil.
- Stretch out dough until it's about 2cm thick. Cover with cling film and leave to rise for at least thirty minutes to an hour.
- Preheat oven to 220c
- Bake for 15 minutes

Notes: I used plain flour as I didn't have any strong flour, which worked well. It's not ideal but will work if it's all you have.

Additions: A little minced garlic, finely chopped green olives and/or dried or fresh rosemary would work a treat with this. Mix them in at the dry stage for added flavour.

Friday, 6 February 2009

Potato Wedges

In need of an easy snack for an evening in front of the box? Try these out. They actually couldn't be simpler and I can almost guarantee that you have all the ingredients you could need in your cupboards right now.

Potato Wedges

Ingredients
Potatoes (one per person with one or two on top for luck)
Sunflower oil
Cajun Spice Mix
Cumin
Paprika
...or any herbs or spices you fancy!

- Preheat oven 180C
- Cut potatoes into wedges; don't worry about peeling them just cut in half then into segments by cutting each into quarters longways. Put them into a bowl.
- Drizzle with two or three tablespoons of oil. You don't need much, just enough to thinly coat the potatoes.
- Add a teaspoon of each spice and mix everything around (ideally with your hands).
- Spread the wedges out on a baking tray and bake for about thirty minutes (turning halfway through) or until soft and crispy around the edges.

Saturday, 20 December 2008

Easy Party Snacks

We - by that I mean myself and my darling man (who categorically does not like being called "the boy"...) - receive an invite to an evening in the company of good friends with the condition that we should bring some snacky starters in return for a home-cooked main course and pudding. Fair enough, I think but can't find myself inspired into my usual cooking frenzy. You see, some members of our party have slightly particular tastes (no fish, nothing spicy, etc). Add to this conundrum that the main course is curry and my mind is stuck in a stale rut. The answer, of course, comes from my boyfriend's mother brandishing some ever faithful Delia. What we produced went down very well and without having to venture outside the warmth of her home.

Easy Cheesy Pinwheels

Ingredients:
Puff Pastry (from frozen, fresh or handmade)
Plain flour for dusting
Cheddar Cheese
Soft Cheese
Grilled Smoked Bacon (finely chopped)
Olives (finely chopped)
...or whatever goodies you fancy/have!

- Preheat oven to 220C
- Roll out pastry. It doesn't matter how much you have so long as it is about 5mm thick when you've finished
- Sprinkle half of the pastry with cheddar cheese and spread the other half with a thin but even covering of soft cheese
- Spread out the bacon across the cheddar cheese and the olives across the soft cheese. You should aim to have an even covering so you will get a little of the filling in each pinwheel but not so much that the cheese is completely covered otherwise they might not stick together.
- Fold the opposite outer edges into the middle of the pastry (across the two fillings). This can be tricky if you have a large area of pastry. Get some help from someone useful or use a spatula.
- Fold the outer edges (of the folded sides) into the middle again. This sounds like a complicated process and is a bit difficult to explain but is actually really easy when you're doing it.
- Cut 5mm slices across the folds to form each pinwheel and lay on a greesed tray or onto a tray lined with reuseable baking paper.
- Bake for ten to fifteen minutes until golden.

Use whatever you have - different cheese work well. Indeed, you could simply do a "Four Cheese" version with cheddar, parmesan, stilton and mozzarella. We found that the pinwheels with soft cheese baked differently and didn't rise like the cheddar ones which was strange but they were just as tasty. Other ideas are:
>Goats cheese with pinenuts and pesto
>Mozzarella with sun-dried tomatoes
>Cheddar cheese and anchovy

Oh and we also made some Tiny Cheese, Onion and Olive Scones served warm, filled with blue or soft cheese. I'll leave Delia to tell you how it's done!
Related Posts Plugin for WordPress, Blogger...