Pages

Showing posts with label Artwork. Show all posts

Friday, 27 January 2012

Telling porkies

You're aware of my love affair with Stylist magazine after their Nigella-edited caramel issue. Well, Stylist's brother title (one for the boys) is Shortlist which is another fab weekly free paper. They write about lots of fun stuff including the very best in gadgetry, entertainment and male style. Having been something of a tom boy growing up, I like to pluck a copy out of the arms of the newspaper fairies that stoically brave the streets and underground during it's busiest periods to bestow us with light entertainment on our travels.

They have various "Instructions for men" ("an instruction manual worth reading"!) and the above diagram grabbed my eye while I read about how not to be conned online and other useful stuff. Accompanying their "How to make a proper pork pie from scratch" article, Dave Hopkins beautiful illustration harks back to the good ol' days of black and white etchings. I adore the detail; it reminds me of some of the worn cookery books that live on my parent's kitchen shelves.

Saturday, 14 January 2012

Phone Stacking: Modern table manners

You're absorbed in an animated conversation with your friends or loved ones over a well-earned meal. The atmosphere is warm and friendly until a beep or "comedy" noise rings out among the chatter and a member of your party fumbles their phone from their pocket. Before you know it, the conversation has dissolved as everyone around the table, inspired by the black sheep of the group, decides to check their phones. Food goes cold and conversations run dry as the majority "quickly" check their messages, facebook, twitter and emails. Does this sound familiar?

Mobile telephone are awesome. I'm a huge fan; they're great! But they're also incredibly disruptive at the dinner table. I stumbled upon Telephone Stacking, the ingenious etiquette game for the dinner table. When your group sits down to eat, each person in turn places their phone facedown one on top of the other. If anyone breaks the stack by checking their phone has to pay the bill for everyone. The entire table! If everyone resists temptation, everyone pays their own share. Good eh?

Thursday, 9 June 2011

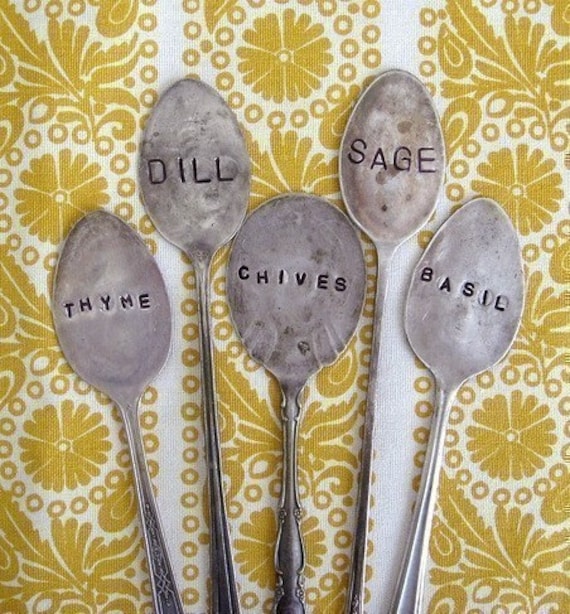
Silver Spoon Plant Markers


So there I was, enthusing about herbs when I happened across this amazing how-to for character-full plant markers. I love the idea of using old utensils to mark out plants that will eventually end up in the kitchen and then on your plate.

I’m something of a hoarder by nature, which probably drives The Boy crazy. I do my best to keep it under control and I’m much better than I used to be. I think this is something to do with the terror of moving in with someone and realising that they’re going to see how many boxes you bring through the front door. They have to live with your junk (as well as any emotional baggage you’re carting around) and you with theirs. It might also be something to do with the fact that I’ve moved at least four times in the last five years and lived out of a suitcase for around six months of that. It certainly teaches you something about travelling and living light...

Anyway, on seeing this, my hoarder tendencies have been whispering to me; encouraging me to buy up antique spoons from ebay and to make a little trip to our local charity shops in search of unusual cutlery. Surely one or two spoons or a funky spork wouldn’t hurt, says the little voice. But no. I’ll be good (I can hear The Boy breathing a sigh of relief).

Still, if you have the space, time and ability, why not make a few of these beautiful markers? A treat for the eyes and reusable too. And while you’re at it, be a doll and make me some too?

If you don’t have the space, time or ability (or maybe you don’t have the equipment or inclination), you can recycle your old butter or ice cream tubs that aren’t being used for growing herb seedlings. They can easily be turned into simple but effective plant markers that can be cut, labelled and put to good use in less than five minutes flat.


Simply wash out your old tub with warm soapy water and dry. Then cut out as many long strips of plastic as you need – I’d recommend making them at least 1cm wide so that they’re easy to write on but go as creative as you like. The top moulded edge makes an ideal top to the marker as the cut plastic can sometimes be a little sharp. Don’t forget to cut a point into the bottom of the strip for easy insertion into the soil.

One side will have the butter or ice cream branding or packaging colours on but if you turn it over and voila! You’ll have a nice white or cream blank canvas to write on. Use a permanent marker to mark on your plant names then just place in your pot and get growing. You can even reuse your marker when you’ve planted out your seedlings or eaten your herbs by removing the writing with a plastic scouring pad. Super thrifty recycling!

Monday, 6 June 2011

Potter's Tea Party


I have been missing Oxford lately. I’m not sure whether it’s the recent warm weather (perfect for lazing around in the Parks or for punting) or the multitude of celebratory post-exam/hand-in Facebook activity that’s got me reminiscing. Despite the stress, my university days were pretty awesome and Oxford is a fantastic city to be a student in.


This weekend, I was handed an excuse (well, two actually) to hop in my battered little car, turn up my music and pay a long overdue visit to the dreaming spires. I had been invited by the lovely Lamadrian of The Sprouting Teapot blog to spend a relaxing afternoon painting pottery and drinking tea. Needless to say, the combination of painting and hot beverages is cloud nine in my book. Shamelessly girlie, I know.

Despite high-hopes for the day, I was truly treated. Homemade chocolate hazelnut éclairs on arrival followed by kumquats (just keep chewing!) dipped in left over melted chocolate. Both were just as delicious as they sound and I’m very inspired by the homemade choux pastry. I will have to give it a go in the near future!

Next, we ambled to St Ebbe's in Headington where the church had been transformed into a pottery studio complete with paints, ceramic pens and plenty of naked crockery crying out to be decorated. Naturally, it wouldn't be a tea party without suitable refreshments and we were spoilt for choice. With ten different types of tea and a whole table laden with sweet goodies, I knew that I was going to be getting my tea and cake quota for the week.
 
For a mere £10, I was presented with a mug, bowl, jug and cake stand to paint with a selection of ceramic paints and pens plus all the homemadecake I could munch. What a lovely way to spend an afternoon!

Wednesday, 4 May 2011

Volcano Tea and Fire pit Sausages


What better to way to celebrate a birthday than to have a beach picnic? A bit of sand in your sandwiches never hurt anyone but the Birthday Boy had simpler ideas for his festive feast. So we packed up our bags with blankets, bikini’s (In April! Who were we kidding?) and bundles of fire wood and headed to Inch Strand beach.


We set up camp and built a fire pit with rocks and pebbles to fill with dried out seaweed, drift wood and logs from our own stash. With the sun shining, the Birthday Boy installed himself in front of the fire and grilled sausages while everyone else collected pointy sticks (for eating said sausages) and sipped homemade lemonade. When the sausages were declared to be suitably browned, they were spiked with driftwood sticks and dunked into Ballymaloe Country Relish. Delicious!

As more relatives and friends trooped across the sand, cheese on homemade soda bread topped with more Relish was handed out. Now all we needed was a good cup of tea and maybe a slice of cake to round things off.
“Where’s the volcano kettle?” Someone shouted. Volcano kettle!? Had I heard rightly? My hosts produced a stainless steel contraption and proceeded to explain how it worked. Despite its exotic name, the principle is quite simple.

Five Minute Scribble Volcano Kettle

Volcano kettles, sometimes known as Kelly or Storm Kettles, have a central chamber for wood which is lit to boil water in a surrounding chamber. They were first dreamt up by ghillies on the West Coast of Ireland and are ideal for brewing a cuppa on the go. Because the fire chamber is small, you can use twigs, sticks and leaves (or in our case, drift wood and dried out seaweed) to boil your water rather than having the hassle of building a proper fire. The built in spout and attached handles make it easy to pour too. How cool is that?
Teas all round!

Tuesday, 22 February 2011

It's all about... marmelade!


“...And I’m going to try out a marmalade recipe I’ve found,” said a friend. “It looks really easy!” This was the first that I’d heard of marmalade-making at home and the impending Seville orange season. My family have made jam through the generations – my Grandmother, in particular, would turn out jars and jars of fruity concoctions fuelled by my Grandfather’s allotment – but never, to my recollection, marmalade.

My curiosity was further sparked by Felicity Cloake’s Guardian article on how to make marmalade. It sounded, as my friend has previously said, easy. Suspiciously easy... You see, the process of boiling down ingredients until they solidify (of their own accord!) into jewel-coloured jellies seems a lot like magic to me. I’m slightly wary of it and its need, or so it seemed at first, for specific equipment (jam thermometers, muslin squares, preserving pans...) only makes me more cagey.

With a little research (mostly involving chatting over good cups of coffee with friends), I decided to jump in and give it a go. Orange marmalade didn’t really grab me, I must admit. Instead, I decided on pink grapefruit and lemon (much to The Boy’s disgust as he hates grapefruit but loves lemons), armed with a recipe from my Mother-in-Love’s Good House Keeping recipe book. Without the ‘necessary’ equipment, I threw caution to the wind and got stuck in.

I’ll warn you now: it’s a time-consuming process. But with the radio on and a Sunday afternoon stretching ahead of me, I found it quite a peaceful hour of peeling and chopping. I did get to try out my brand new zester (a present care of my Mother-in-Love) which made light work of the citrus peel and produced gorgeously uniform curls which are rather pretty. It didn’t take off all the peel so I ‘zested’ the fruit and then used a normal peeler to remove any skin that remained.

Next, I removed the smooth, white pith by slicing off the top and bottom of the fruit, just deep enough to touch the flesh. Then I sliced downwards, curving around the fruit and taking off strips of pith. From what I’ve read, it’s important to keep the pith in the mixture as it boils due to its high pectin content (that wondrous stuff that makes jam firm up). So, I roughly chopped down the strips which went into a bowl lined with a clean tea towel, just to keep things tidy.


Grapefruit & Lemon MarmaladeMakes 6 jars

2 large pink grapefruit
4 large (unwaxed) lemons
1kg sugar
2l water

 - Rinse your fruit and dry with a clean tea towel.
 - Zest the fruit with a zester and then peel the remaining skin from the fruit. Alternatively, use a peeler to remove the skin and then chop as finely as you can muster. Put all of the peel into a saucepan.
 - Cut the top and bottom of each fruit so that you can just see the flesh coming through the white pith. This will help keep the fruit steady as you remove the rest of the pith. Put the pith into a bowl lined with muslin or a clean tea towel.
 - Place the fruit on the flat side that you've cut and slice of the pith - cutting just deep enough to remove the pith and leave most of the flesh. Put any pith into the muslin lined bowl.
 - Segment the flesh, putting the membrane into the muslin lined bowl and putting each segment into the saucepan with the peel. Remove any pips that you come across and bung them in the muslin bag too.
 - Gather up the muslin containing the peel into a bundle and tie securely with cotton or string. Pop it into the saucepan with the flesh and peel. Top up with the water and simmer gently for 2 hours, stirring occasionally.
 - Test the peel - it should now be tender. Remove the muslin bag and allow too cool enough so that you can handle it. This can take a while but be patient.
 - Bring the marmelade back up to a simmer and squeeze the muslin bag over the pan. A milky white liquid will seep through - this is the precious pectin (mostly from the pith of the lemons) that will help your marmalade to set.
 - Add the sugar and stir well so that it dissolves and the pectin is evenly distributed.
 - Pop a saucer or two into the freezer and bring the marmalade to a rapid boil. The liquid will reduce down and start to thicken slightly. Test for a setting point by dripping a little marmalade onto a chilled plate to see if it forms a skin. If it does, you can start to jar your marmalade but if not, don't worry. Keep boiling it down (reducing the water content and therefore increasing the proportions of pectin that will help it set) until it does.
 - I find the easiest way to jar is dip a small pyrex or heatproof jug into the saucepan to collect the marmalade then using that to pour it into sterilised jars. Seal with clean lids and store in the fridge once they're opened.

Related Posts Plugin for WordPress, Blogger...