Pages

Monday, 13 June 2011

Simple Home-baked Scones


 When a few friends came over to visit this weekend, the last thing that I was expecting was for one of my male friends to bring his craving for cream teas all the way over from Hampshire. This is a guy who likes mountain biking and sailing. And fast cars. And shoot-em-up pew-pew-pew computer games. He’s no less macho than your average man and yet he craves little cakes with cups of tea. Not that I’m suggesting anything, of course.

Anyway, a rainy post-mojito Sunday morning dawned and it was clear that no one wanted to leave the warm and dry of our flat in search of tea and cake. Instead, I got out my trusty scone recipe and threw together a batch. They’re so simple to make – preparation takes about 10 minutes or so and they don’t take much longer to bake. Within half an hour, you can be munching on warm scones.

Please don’t bother with the supermarket versions that are available; I’ve always found them to be a tremendous disappointment. Dry, crumbly and tasteless. Homemade scones are amazingly easy and so worthwhile for the flavour alone. Serve with clotted cream and strawberry jam for an authentic feel or go for whipped cream if the divine clotted kind isn't available. Just as lovely with butter, of course, though not quite as decadent. Top with a few British strawberries if you're feeling fancy (or if they were going cheap at the supermarket, like us!)


Sultana Scones
Makes 8 - 10

225g self raising flour
40g unsalted butter, at room temperature
1 ½ tbsp caster sugar
Pinch of salt
125ml semi-skimmed milk
50g sultanas

- Preheat oven to 220C
- Sift the flour over the butter in a large mixing bowl. Rub the two ingredients rapidly between your fingers to bring it together, taking care to break down any lumps. The mixture will have an almost sandy texture once you’re done.
- Add the raisins, sugar and salt and stir in with a table knife.
- Pour the milk into the bowl, a little at a time, mixing it in with the knife. The mixture will come together as you add the milk. You might not need to add all of the milk if the pastry is coming together nicely. If it looks a little dry, add a splash more milk.
- Flour a pastry board or (in my case) a clean worktop and roll out with a floured rolling pin. The pastry should be about ¾ inch thick. Cut your desired shapes – I used a floured glass but you can go as wild as you like with your pastry cutters.
- Pop the scones onto a parchment covered baking tray and bake for 12 – 15 minutes until golden brown.
- Allow to cool for a few minutes and serve warm with cream or butter and jam.

Friday, 10 June 2011

Spicy Roasted Chickpeas - A delicious and healthy snack!


My current office is a snack paradise. There are biscuits and sweeties galore, which is dangerous if you don’t have much will power (ie. me). I’ve realised, since I’ve worked here, that hunger can be psychological. I’m not necessarily hungry until I see the biscuit tin or until I hear one of my colleagues crunching through some crisps. Of course, writing about food regularly adds to my appetite too.

I’ve developed an arsenal of healthy snacks to keep me on the straight and narrow. Rice cakes are on hand for their satisfying crunch rather than flavour (as they don’t really have any of the latter but tons of the former). Rye crisp breads with dried fruit come in handy when I have a biscuit craving and I always have fresh seasonal fruit too. Sometimes I have a clamouring for something savory to pick at and my normal (thoroughly addictive) go to is cashew nuts but though they are choc ful of great things like protein, they are relatively high in fat. So when I saw healthy snack chat on BBC Good Food's facebook page, I had to see what everyone was nibbling on. Karolina from lovely Senses in the Kitchen blog put forward an amazing recipe for roasted chickpeas, which I just had to try out.

Chickpeas are a great source of protein without the fat that's associated with nuts. They also have iron, folic acid and fibre tucked away under their skins. I think this would work with any fresh or dried herbs and spices that you might have. I used chilli and paprika as the main flavours but you could use harissa for a Morrocan vibe or go sweet with cinnamon, nutmeg and a little honey. Change it up with different oils as a base - I used olive oil but sunflower, rapeseed or walnut would also work well. Chickpeas are a fantasticly versatile base for flavour plus they're part of a deal at Sainsburys at the moment where you can get 3 cans for £1 - a saving of 80p (more than a whole can free!). Everyone might be talking about kale crisps but we know where the real flavour is at...


Spicy Roasted Chickpeas

1 can (410g) ready to eat cooked chickpeas

1 tbsp olive oil
1 tsp hot chilli powder
1 tsp smoked paprika
1 tsp garlic salt
1 tsp ground coriander
½ tsp ground cumin
Pinch of ground mace
Ground black pepper to taste

- Preheat the oven to 180C.
- Drain the chickpeas and rinse well in a colander, picking out any skins or green/grey chickpeas.
- Put into a large bowl and add the oil and spices.
- Stir thoroughly so that each pea is coated in oil and spices.
- Taste and adjust the seasoning depending on your preferences.
- Spread the chickpeas on a baking tray. Gently shake the tray from side to side so that the chickpeas lie in one layer.
- Roast for 30 – 40 minutes until the peas are slightly crunchy.

Thursday, 9 June 2011

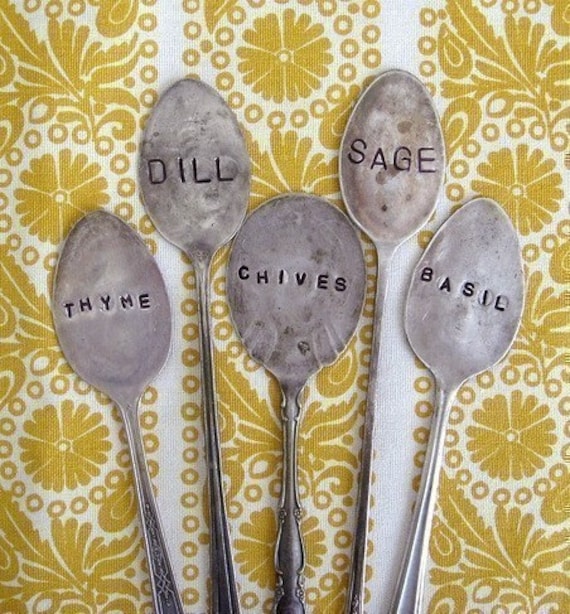
Silver Spoon Plant Markers


So there I was, enthusing about herbs when I happened across this amazing how-to for character-full plant markers. I love the idea of using old utensils to mark out plants that will eventually end up in the kitchen and then on your plate.

I’m something of a hoarder by nature, which probably drives The Boy crazy. I do my best to keep it under control and I’m much better than I used to be. I think this is something to do with the terror of moving in with someone and realising that they’re going to see how many boxes you bring through the front door. They have to live with your junk (as well as any emotional baggage you’re carting around) and you with theirs. It might also be something to do with the fact that I’ve moved at least four times in the last five years and lived out of a suitcase for around six months of that. It certainly teaches you something about travelling and living light...

Anyway, on seeing this, my hoarder tendencies have been whispering to me; encouraging me to buy up antique spoons from ebay and to make a little trip to our local charity shops in search of unusual cutlery. Surely one or two spoons or a funky spork wouldn’t hurt, says the little voice. But no. I’ll be good (I can hear The Boy breathing a sigh of relief).

Still, if you have the space, time and ability, why not make a few of these beautiful markers? A treat for the eyes and reusable too. And while you’re at it, be a doll and make me some too?

If you don’t have the space, time or ability (or maybe you don’t have the equipment or inclination), you can recycle your old butter or ice cream tubs that aren’t being used for growing herb seedlings. They can easily be turned into simple but effective plant markers that can be cut, labelled and put to good use in less than five minutes flat.


Simply wash out your old tub with warm soapy water and dry. Then cut out as many long strips of plastic as you need – I’d recommend making them at least 1cm wide so that they’re easy to write on but go as creative as you like. The top moulded edge makes an ideal top to the marker as the cut plastic can sometimes be a little sharp. Don’t forget to cut a point into the bottom of the strip for easy insertion into the soil.

One side will have the butter or ice cream branding or packaging colours on but if you turn it over and voila! You’ll have a nice white or cream blank canvas to write on. Use a permanent marker to mark on your plant names then just place in your pot and get growing. You can even reuse your marker when you’ve planted out your seedlings or eaten your herbs by removing the writing with a plastic scouring pad. Super thrifty recycling!

Monday, 6 June 2011

Potter's Tea Party


I have been missing Oxford lately. I’m not sure whether it’s the recent warm weather (perfect for lazing around in the Parks or for punting) or the multitude of celebratory post-exam/hand-in Facebook activity that’s got me reminiscing. Despite the stress, my university days were pretty awesome and Oxford is a fantastic city to be a student in.


This weekend, I was handed an excuse (well, two actually) to hop in my battered little car, turn up my music and pay a long overdue visit to the dreaming spires. I had been invited by the lovely Lamadrian of The Sprouting Teapot blog to spend a relaxing afternoon painting pottery and drinking tea. Needless to say, the combination of painting and hot beverages is cloud nine in my book. Shamelessly girlie, I know.

Despite high-hopes for the day, I was truly treated. Homemade chocolate hazelnut éclairs on arrival followed by kumquats (just keep chewing!) dipped in left over melted chocolate. Both were just as delicious as they sound and I’m very inspired by the homemade choux pastry. I will have to give it a go in the near future!

Next, we ambled to St Ebbe's in Headington where the church had been transformed into a pottery studio complete with paints, ceramic pens and plenty of naked crockery crying out to be decorated. Naturally, it wouldn't be a tea party without suitable refreshments and we were spoilt for choice. With ten different types of tea and a whole table laden with sweet goodies, I knew that I was going to be getting my tea and cake quota for the week.
 
For a mere £10, I was presented with a mug, bowl, jug and cake stand to paint with a selection of ceramic paints and pens plus all the homemadecake I could munch. What a lovely way to spend an afternoon!

Friday, 3 June 2011

Bakers and Shakers

Are you a baker? Or a shaker?

We went to see the hilarious Dylan Moran of Black Books fame last night. He posed an interesting question: Are you a baker or a shaker? Namely, do you bottle things up that annoy you (a 'baker') or do you react to anything and everything (a 'shaker'). He generalised that most Britons were bakers; revolution in England, he claimed, would take thousands of years. The first few hundred years would be marked by putting your coffee cup hard on your desk and would culminated with an angry outburst of "You know, he really gets on my wick!" Italians and Arabs, for example, are shakers says Moran. Passionate, expressive, unpredictable and hyperactive people. I found this very funny. Being raised by an English rose of a mother and an Arab camel of a father, what mixture am I?

When you consider our traditional foods, you can see where he's coming from. Comparing, say, Britain's classic toad in the hole with a Moroccan tagine is quite a contrast. Both great in their own way but two ends of the spectrum flavour-wise. Cosy, comforting-if-a-little-bland stodge on one hand and fragrant, spicy juicyness on the other.

Foodwise, I love to bake in the literal sense. I'm not sure why as I'm not a huge fan of sticking to recipes or measuring things out accurately (prefering the more slap-dash, bung-it-in-and-see-what-happens approach), both things that are required of baking as, at the end of the day, the successful rising of a cake seems to come down to chemistry. I do love sweet things though and I think that this is the key to my love affair with the oven.

In terms of flavour, I'd like to be a shaker. I like to try new combinations of spices and am pretty confident when it comes to adding them to meals though I often come back to similar flavours. I love how cocktails (shaken, not stirred naturally!) taste but I'm not such a fan of their effects. Maybe it's a taste thing... Or maybe I'm just boring!

Thursday, 2 June 2011

Scrumptious Coffee & Walnut Cake


Today is a colleague’s birthday so I’ve decided to go against the normal traditions (link) and make her cake instead of her bringing in her own. The consensus in our office was that coffee cake was one of the best cakes around so I dug out a recipe and decided to give it a go.

Shock horror when The Boy returned after a day of promoting his trade at The Bath & West Show (baring foodie goodies!) to find our kitchen filled with the scent of coffee. He is a tea drinker and can’t stand the strength or bitterness of coffee. His resolve did crumble slightly when I gave him a taste – he confessed that it wasn’t all that terrible.

I tried out another of Angela Nilsen’s Ultimate Makeover series – a low calorie, low fat cake does limit my food guilt even though it’s only an occasional treat. It was a pretty simple recipe to follow. A lot of the ‘good for you’ cake recipes of the sponge ilk that I’ve come across need you to whisk up egg whites and other faff but this one, thankfully, has none of that. The filling, which I also used as a topping in the place of icing, involves making a syrup from water, coffee and sugar which takes a little care and patience but is worth it.

Angela’s original recipe can be found here. She managed to cut hers into three and filled it in with the filling then topped with icing. Mine didn’t rise enough so I was only able to cut it in half but it did mean that I didn’t need to make icing. Less bowls to wash up. Bonus! I also substituted low fat mascarpone with light cream cheese and a little yoghurt which worked well.

Coffee & Walnut Cake
Makes 12 servings

225g self raising flour
50g ground almonds
1 tsp baking powder
1 tbsp instant coffee granules
85g light brown muscovado sugar
50g golden caster sugar
2 eggs, beaten
250ml low fat natural yoghurt
75ml walnut oil
25g chopped walnuts

For the coffee cream to fill and top the cake
140g icing sugar, sifted
140g Quark
100g low fat cream cheese
3 tbsp low fat natural yoghurt
2 tsp instant coffee granules
2 tbsp golden caster sugar
½ tsp vanilla extract
Handful of walnut halves to decorate

- Preheat the oven to 180C and line a loaf tin with greaseproof paper.
- Mix the coffee granules with 2 tbsp of warm water and stir until dissolved.
- Mix the flour, sugars (Angela suggests rubbing the muscovado sugar through your fingers to get rid of the lumps which I did and it really helped), walnuts, ground almonds and baking powder into a bowl and mix well.
- Make a well in the dry ingredients and pour the eggs, coffee mixture, yoghurt and oil into it. Stir thoroughly until combined.
- Scrape into the prepared tin and bake for 40 – 45 minutes until a skewer comes out clean.
- Leave on one side to cool.
- Meanwhile, make the coffee cream. In a saucepan, mix the coffee granules and caster sugar with 2 tbsp of warm water. Put the saucepan on a low heat and stir until the sugar and coffee are dissolved into the water.
- Turn the heat up under the saucepan and gently simmer the mixture, stirring occasionally, for around 2 ½ minutes until it is thicker and darker then leave to cool. As Angela states in her original recipe, when cooled, the mixture has the consistency of treacle or golden syrup.
- While the mixture is cooling, whisk the other ingredients together. Add the cooled coffee syrup and fold through.
- Cut the cooled cake in half (or more if it’s risen well and you can manage it) and fill with half of the coffee cream.
- Assemble the cake, top with the rest of the coffee cream and decorate with walnut halves. Serve with a cup of Joe or even a cup of tea!

Wednesday, 1 June 2011

Desert Island Herbs

I was perusing my usual culinary sources today and came across this lovely article by Alys Fowler. In it, she ponders what she would grow if she didn't have a garden - her desert island plants, as it were. This sparked my interest as I've had to come at it from the opposite angle - namely, "I don't have a garden so what can I grow?"

Both of us, it seems, have decided that we can't live without the wonders that are herbs. For Alys, the essentials are mint, coriander and lemon thyme. These are a great resource when it comes to Mediterranean and Eastern cooking; the scent of lemon thyme and mint remind me of Greek holidays while fresh and dried coriander feature in all of my Indian curries and oriental dishes.

My driveway garden lives in pots and includes a motley crew of rosemary, sage and thyme as well as a tub of lemongrass (transplanted from a colleagues garden for tea) and a few sprigs of parsley that have lived on through the winter. My window sills are currently home to basil and oregano seedlings as well as some baby lettuces (another present from a colleague). Next on my list are:

- mint: wonderful in a warm aubergine salad, a perfect pairing with roasted lamb and essential in tzaziki.

- coriander: fantastic on chilli con carne, brilliant blitzed into guacamole and delicious in dhal.

- tarragon: tasty in a sauce for chicken, marvellous when paired with mushrooms and a scrumptious flavour with salmon.

- dill: fabulous with fish, rather lovely in ratatouille and stirred into a herb mayonnaise.

With herbs on my mind, I happened upon an advert in a cookery magazine which hit the mark. The image above is from a Lurpak advert. "Kings of the Kitchen", how apt! Turns out that Lurpak are giving away seeds with packs of Lurpak spreadable. Whether you like their margarine or not, their website gives some great information on growing and cooking herbs. How about keeping your old margarine or yoghurt tubs, popping a few holes in the bottom and filling it with compost to grow your herbs in?
Related Posts Plugin for WordPress, Blogger...