Pages

Sunday 29 April 2012

Butternut Squash Risotto with gorgonzola and wild garlic purée


Nothing rings in the lighter evenings like a camping expedition complete with smoke-swathed open fire. Despite the weather, we met up with some friends up North and we needed something to feed the masses al fresco at the lovely Cronkshaw Fold Farm. Given the horrendous wet weather and cool breezes, risotto seemed to fit the bill very well in terms of belly-filling and easy multiplication for a large party. The rain clouds parted for a brief interval so the pan was finished off over the barbecue while everyone drank Parchers (Pimms and Archers schnapps mixed with lemonade, obviously...).

Our night under canvas was somewhat scuppered by the heavens opening as we chomped our way through pudding. The hardened (and particularly warm-blooded) members of the gang earned kudos and man points by slumbering al tento though I must admit that The Boy and I retired to the protection of the farm house to find nocturnal shelter from the deluge.


Wild garlic is still in season and if you're fortunate enough to catch it before it flowers, it's a fantastic free ingredient. It's plentiful in hedgerows and the countryside in general so pick it while you can. You can find lots of friendly faces online who are willing to through in their tuppence-worth on how to identify and pick this pungent delight. The purée featured below makes a fantastic addition to your fridge jar collection as its incredibly versatile. Whisk it into salad dressings, stir through pasta or fold into pesto for a grassy, garlic hit.


Butternut Squash Risotto with gorgonzola and wild garlic purée
Serves four (but easily multiplied for a larger party, as I did)

For the risotto
1  medium-sized butternut squash, halved with seeds removed
1 onion, finely diced
2 carrots, finely diced or grated
2 clove garlic, peeled
300g risotto rice
160ml white wine or dry vermouth (or a splash of white wine vinegar)
1l vegetable stock
50g butter
50g parmesan, grated
125g gorgonzola

For the purée
120g (several large handfuls) fresh wild garlic leaves, washed
50ml olive oil

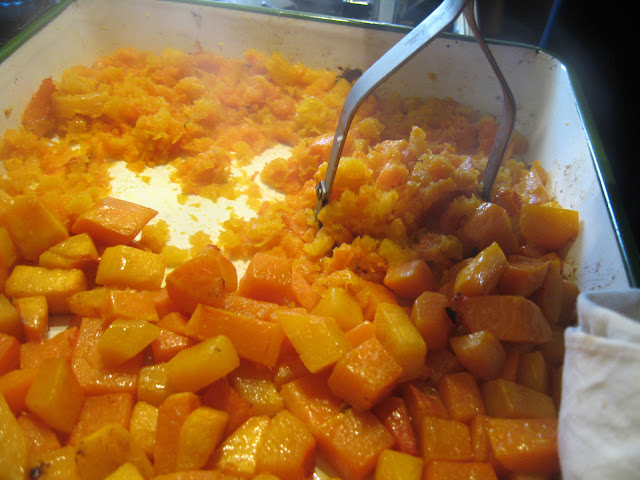
- Preheat the oven to 190C. Peel and chop the squash into 1.5cm chunks. Pop them on a non-stick baking tray with the garlic cloves and stick them in the oven for 30 minutes or so while you make the risotto. Check the squash every so often and turn it with a spoon to ensure that it cooks evenly. The squash is cooked when its soft when pressed, slightly golden and starting to caramelise around the edges.
- Heat a large pan of boiling water and drop the wild garlic leaves into it. Leave them to soak for a mere ten seconds then remove them and plunge into cold water for a minute or two and drain.
- Blitz the leaves with olive oil in a food processor until smooth.
- Heat a little oil in a heavy-based saucepan and sweat the onion and carrot until soft and sweet.
- While you wait, heat up your stock so that it is warmed through and keep it on a low heat.
- Tip in the rice and stir until it has absorbed all of the juices of the vegetables in the pan. Pour in the wine (or vinegar) and keep stirring while that absorbs to ensure that the rice doesn’t stick.
- Add the hot stock a ladleful at a time, stirring until all of the liquid is absorbed before adding more.
- Check the butternut squash, which should be cooked through. (If it isn’t, cover the risotto and turn off the heat below it.)  Mash half of it with the garlic cloves to a course purée and stir this into the risotto with the butter and parmesan. Fold in or top with the rest of the roasted squash, dot with wild garlic purée and sprinkle with chunks of gorgonzola.

Do you love risotto? It's fantastically versatile! Why not try a classic butternut squash risotto, sweet and fresh pea risotto or nutty seasonal asparagus risotto.

Thursday 26 April 2012

Pomegranate & Feta Bulgur Wheat Cous Cous Salad


There seems to be one standard topic of conversation today: the weather. Our chatterings have stubbornly circled the subject like flies buzzing lazily around an enclosed room. Anyone venturing outside has returned sullen and soaked through - ah April, we'll be glad to see the back of you and your persistent showers.

I don't know about you but I was certainly in need of some sunshine to brighten up my lunch break. As the English weather wouldn't provide, I decided to get my fix in a culinary form: pomegranate. I adore its mouth-watering sweet flavour and sharp tangy after taste which makes it an ideal partner to salty, milky feta cheese.

A pairing like this needs a hearty foundation which is why this recipe calls for bulgur wheat. It's basically the butch big brother to cous cous - chunkier and meatier with more bite. It's easy to prepare and is ideal for salads; adding spices in the soaking liquor effectively self-dresses the salad so it just needs finishing off with simple lemon juice and mint. Ideal for prepping in advance and assembling at the last minute! Unfortunately, bulgur wheat isn't suitable for those that are sensitive to gluten but it can be substituted for quinoa or rice if necessary.

Pomegranate & Feta Bulgur Wheat Cous Cous Salad
Serves 2 – 4

1 ripe pomegranate
1 red onion, sliced
2 cloves garlic, sliced
2 green chillis, chopped
200g feta
1 tsp dried cumin
1 tsp dried coriander
½ tsp cinnamon
Pinch of ginger
Pinch of turmeric
100g dried bulgur wheat
½ veg stock cube
Juice of half a lemon
Small bunch of mint

- Boil a kettle of water with enough water for around three cups of tea.
- Meanwhile, place the stock cube, dried spices and bulgur wheat in a deep bowl. Once boiled, pour water over the dried ingredients until it is completely covered by ½ inch of water. Stir well and set to one side.
- Sweat the onion with a drop of oil over a low heat for 15 minutes, stirring occasionally so that it does not stick, until soft and translucent.
- Add the garlic and chilli and allow to soften and the flavours mellow for a minute or two. Set to one side off the heat.
- Remove the seeds from the pomegranate and crumble the feta. Remove the leaves from the mint and roughly chop or chiffonade if you’re fancy.
- Check the bulgur wheat; it should be plump and tender and have absorbed the liquid. If it’s not tender, leave it to soak a little longer. If it’s tender but still has excess liquid, drain through a sieve.
- Assemble the salad by tossing the tender bulgur wheat with the softened onions, pomegranate seeds and crumbled feta. Dress with mint and lemon juice.

Tuesday 10 April 2012

Rachel Khoo's Little Kitchen in Paris


Life has been fantastically busy for me in recent weeks. I’m only comforted by the fact that this seems to be commonplace in my social circles at the moment. My diary has been filled up with scribbled times and places and the coming months look even worse. I have resolved to find time to chill out and do very little but I’ve found this rather difficult given my cumbersome schedule to date. I had a moment to reflect on this while I sat on the Tube, zipping from one engagement to another and realised that I’m not actually very good at stopping. I find it difficult to close the door on life and focus on relaxing; it seems like my ‘to do’ list has grown limbs and is incessantly tapping at the door, tapping its foot impatiently. 

Anyway, I did find time to sit still for thirty glorious minutes and decided that it would be a good time to watch something. In the mood for some light relief and some culinary inspiration, I watched The Little Paris Kitchen: Cooking with Rachel Khoo on BBC iPlayer. 

As you know, I’m not the biggest fan of food programmes (am I, Sophie Dahl?) but this was… okay. Better than most, I would say, mainly because she’s cooking in unchartered territory – a real kitchen. A refreshing contrast to the airy loft conversions and country farm kitchens (complete with wood-fired oven) that are the backdrops to most ‘sleb cookery programmes. I’m pretty tired of aspirational kitchens on TV; gimme real any day. Kitchen aside, Khoo is a curvy thirty-something with Hepburn-eque cheekbones who hails from Britain and has since made a name for herself in Paris.  She’s likeable and has less of the smug sheen that I’ve come to associate with TV chefs. As a Brit in France, her mission is to simplify French cookery for the masses.

Despite laying it on thick about her tiny kitchen, I feel like the producers could have made more out of the whole cooking in a confined environment concept. It may be no bigger than your average bathroom but Khoo somehow manages to squirrel a vast selection of tins, baking trays, food processors et al away somewhere. I’d love to try her madeleine recipe but I simply don’t have the space for another tin in my shoebox kitchen. Maybe they should have given us an insight into Khoo’s magic powers of storage?

The recipes are a little hit and miss but on the whole, I like them. She’s a trained pastry chef á La Cordon Bleu so needless to say her sweets look glorious. The chocolate mousse looks to die for though not all of the recipes are available on the BBC website; doubtless because they want to flog you the accompanying book to the series. During the episode that I watched, Rachel made a sumptuous looking stock (Fantastic, I thought. Real stock!) for her Bouillon de Cassolet. I found myself bristling -waste martyr that I am - as the cute and bubbly Rachel merrily discarded a huge hunk of back bacon and a handful of sundried tomatoes as they were apparently only for flavour. So they’re good for flavour but not for eating? Surely not. 

Anyway, little gripes aside, I quite liked The Little Paris Kitchen: Cooking with Rachel Khoo. If nothing else, the transitional clips of beautiful Paris kept me happy.Worth a watch if you like that kind of thing.

If you're curious, check out The Little Paris Kitchen: Cooking with Rachel Khoo on BBC iPlayer here or watch it as a chaser to Saturday Kitchen at 11:30am on a Saturday morning.

Friday 6 April 2012

Raspberry pancakes


Make breakfast worth waking up for, that’s my motto. This is mainly because I’m not a morning person so I require a meal with enough allure to pull me out from the warmth of my duvet and shake off my sleepy state. I generally go for a wholesome bowl of muesli or porridge but I decided to try something a little different for a change.

I’ve been eyeing up this hearty pancake recipe on IrvingtonWashington’s blog since Pancake Day. I wanted to get up a few hours early and eat with The Boy who tends to be up and out at the crack of dawn to put in a long day at the office. With a leftover tub of Greek yoghurt in the fridge and a bag of frozen raspberries winking at me from the freezer, it seemed like an opportune moment to try it out. I must admit that I cheated a bit; I made them the night before and then microwaved them in the morning. Even I struggle to be a culinary goddess first thing in the morning…

And oh my, these did not disappoint. Deliciously light yet nicely filling – perfect to kick start your day. They’re not very sweet so they definitely need to be served with syrup, honey or jam. Can't wait to try an apple and cinnamon variation. Ideal for the long Easter weekend!

Raspberry pancakes with caramel syrup
Serves two heartily, makes 10 

For the pancakes
250g low/no fat Greek yoghurt
3 tbsp milk
80g plain flour 
3 large eggs, separated
100g frozen raspberries, defrosted

For the syrup (optional)
6 tbsp caster sugar
50ml water

- If you’re making the syrup, start with this. Heat the sugar in a heavy based pan over a medium heat. It will gradually start to melt – don’t be tempted to stir it! 
- Wait until its completely melted and golden brown then add the water. It will bubble and hiss so stand back and let it do its thing then whisk until smooth.
- Next stir the egg yolks, milk and flour together until combined.
- Whisk the egg whites into soft peaks and gently fold it into the egg yolk mixture. Be careful to do this delicately so as not to knock the air out of the mixture. 
- Fold the raspberries into the mixture.
- Heat a non-stick frying pan over a low heat and wipe with a little sunflower oil or butter. Add spoonfuls of the mixture – I kept mine small and thick, like Scotch pancakes. Cook a few minutes until small bubbles will appear at the edges then ease from the bottom of the pan and turn over for a few minutes more.
- Serve warm with the syrup (if using) or with jam or honey.
Related Posts Plugin for WordPress, Blogger...